
Joe主题自动生成文章目录
本文最后更新于 2024-07-06,文章内容可能已经过时。
1. 目录效果图
由于Joe主题是不支持目录的功能的,issues经常会有人请求增加此功能,今天在 issues 上面看到有人给了解决方案,但是和我们的主题效果并不是很搭,所以进行二次修改。
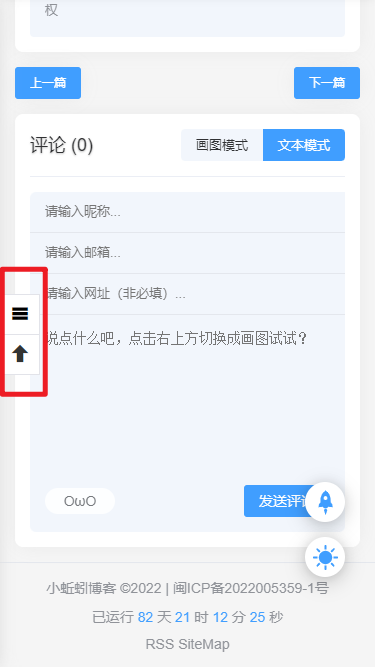
优化前的效果图
优化后的效果图

为了更加符合 Joe 主题,所以默认的 AutocJS 已经可以完成了自动生成文章大纲的功能,但是样式有些突兀,所以我们进一步进行修改文件,文件已经修改好了,直接使用即可。
2 对 Joe 主题进行配置
进入 Joe 主题的全局设置,添加以下两处代码。
自定义增加<head></head>里内容(非必填)
<style type="text/css">
.outline-outside-modal-opened {
    z-index:10000 !important;
    left:0;
    width:300px !important;
}
</style>
<link rel="stylesheet" href="https://fastly.jsdelivr.net/gh/yaohaixiao/autocjs/dist/css/autoc.min.css">
<meta name="baidu-site-verification" content="code-KOjchE2uAF" />
自定义<body></body>末尾位置内容(非必填)
<script src="https://fastly.jsdelivr.net/gh/zhx47/autocjs/dist/autoc.min.js"></script>
<script>
// 文章导航
if ($(".joe_detail__article").length > 0) {
    var switcher = document.createElement('div');
    switcher.className = 'joe_action_item custom_switcher';

    var svg = document.createElementNS('http://www.w3.org/2000/svg', 'svg');
    svg.setAttribute('class', 'custom_switcher');
    svg.setAttribute("viewBox", "0 0 1024 1024");
    svg.setAttribute("xmlns", "http://www.w3.org/2000/svg");
    svg.setAttribute("width", "25");
    svg.setAttribute("height", "25");

    var path1 = document.createElementNS('http://www.w3.org/2000/svg', 'path');
    path1.setAttribute('class', 'custom_switcher');
    path1.setAttribute("d", "M64.67 512c2.03-148.27 27.78-271.04 103.07-344.26C240.96 92.45 363.73 66.7 512 64.67c148.27 2.03 271.04 27.78 344.26 103.07C931.55 240.96 957.3 363.73 959.33 512c-2.03 148.27-27.78 271.04-103.07 344.26C783.04 931.55 660.27 957.3 512 959.33c-148.27-2.03-271.04-27.78-344.26-103.07C92.45 783.04 66.7 660.27 64.67 512z");
    var path2 = document.createElementNS('http://www.w3.org/2000/svg', 'path');
    path2.setAttribute('class', 'custom_switcher');
    path2.setAttribute("d", "M706.07 405.35H327.44c-18.64 0-33.9-15.25-33.9-33.9 0-18.64 15.25-33.9 33.9-33.9h378.62c18.64 0 33.9 15.25 33.9 33.9 0 18.64-15.25 33.9-33.89 33.9zM706.07 563.37H327.44c-18.64 0-33.9-15.25-33.9-33.9 0-18.64 15.25-33.9 33.9-33.9h378.62c18.64 0 33.9 15.25 33.9 33.9s-15.25 33.9-33.89 33.9zM475.54 721.4h-148.1c-18.64 0-33.9-15.25-33.9-33.9 0-18.64 15.25-33.9 33.9-33.9h148.09c18.64 0 33.9 15.25 33.9 33.9 0.01 18.65-15.25 33.9-33.89 33.9z");
    path2.setAttribute("fill", "#FFFFFF");
    switcher.appendChild(svg);
    svg.appendChild(path1);
    svg.appendChild(path2);
    document.getElementsByClassName('joe_action')[0].appendChild(switcher);
    // 创建 Outline 实例
    let navigation = new AutocJs({
        // 文章正文 DOM 节点的 ID 选择器
        article: '.joe_detail__article',
        // 要收集的标题选择器
        selector: 'h1,h2,h3,h4,h5,h6',
        // 侧边栏导航的标题
        title: '文章导读',
        // 文章导读导航的位置
        // outside - 以侧边栏菜单形式显示(默认值)
        // inside - 在文章正文一开始的地方显示
        position: 'outside',
        // 标题图标链接的 URL 地址
        // (默认)没有设置定制,点击链接页面滚动到标题位置
        // 设置了链接地址,则不会滚动定位
        anchorURL: '',
        // 链接的显示位置
        // front - 在标题最前面(默认值)
        // back - 在标题后面
        anchorAt: 'back',
        // 是否生成文章导读导航
        isGenerateOutline: true,
        // 是否在文章导读导航中显示段落章节编号
        isGenerateOutlineChapterCode: false,
        // 是否在正文的文章标题中显示段落章节编号
        isGenerateHeadingChapterCode: false,
        // 是否在正文的文章标题中创建锚点
        isGenerateHeadingAnchor: false
    });
}
</script>
保存后进入任意文章即可看到效果,如果只是需要该功能,以下内容可以不用查看。
3 修改文件说明
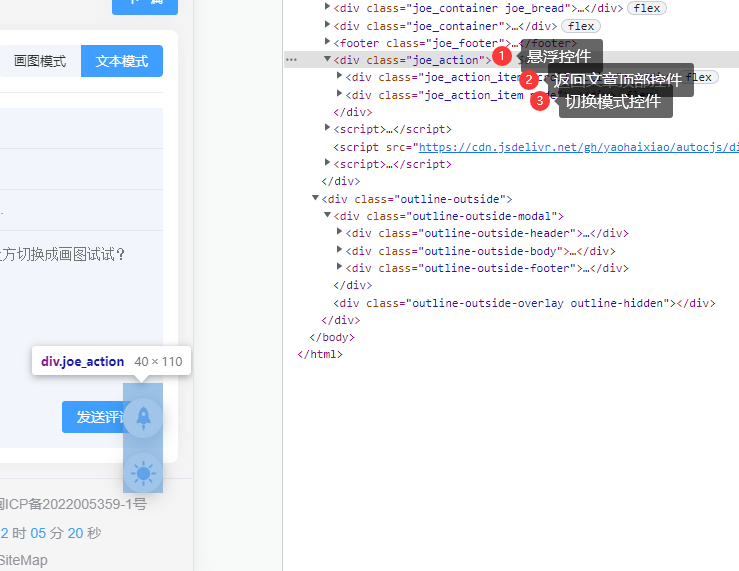
3.1 除去自带的按钮功能
先定位下对外暴露的按钮代码
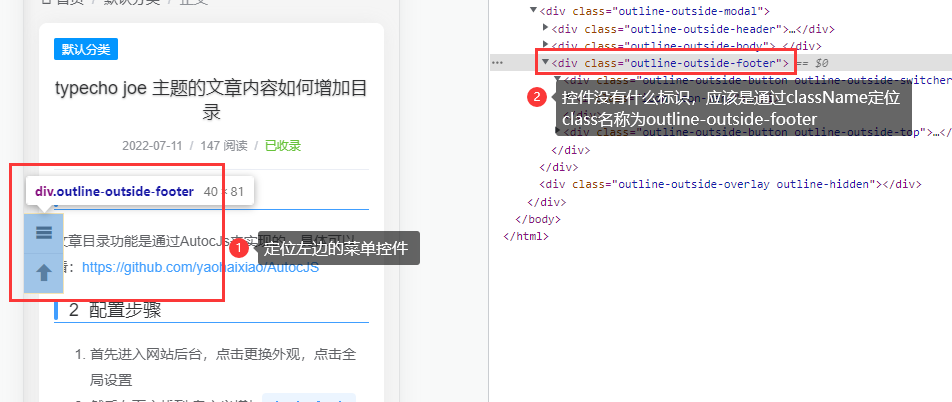
去搜索查看以下 JS 的代码,查看大概的逻辑
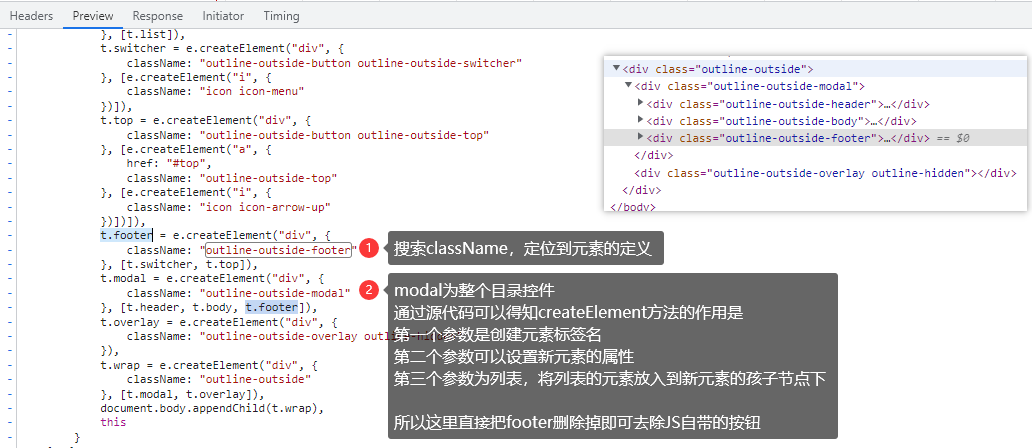
3.2 添加一个自定义按钮
先找一个自己看的顺眼的图标,可以在阿里巴巴上面找一下,然后在页面上找一个新的地方把图片贴上去,这里我直接放在夜间/白天模式的按钮下方
老规矩,定位以下按钮的位置
写一下代码插入进去
// 目录最外层的DIV
var switcher = document.createElement('div');
switcher.className = 'joe_action_item custom_switcher';

// SVG图标,创建元素需要使用createElementNS,否则不显示图片
var svg = document.createElementNS('http://www.w3.org/2000/svg', 'svg');
svg.setAttribute('class', 'custom_switcher');
svg.setAttribute("viewBox","0 0 1024 1024");
svg.setAttribute("xmlns","http://www.w3.org/2000/svg");
svg.setAttribute("width","25");
svg.setAttribute("height","25");

// SVG图标的绘制路径,我这个图片是两个path,自己进行调整
var path1 = document.createElementNS('http://www.w3.org/2000/svg', 'path');
path1.setAttribute('class', 'custom_switcher');
path1.setAttribute("d","M64.67 512c2.03-148.27 27.78-271.04 103.07-344.26C240.96 92.45 363.73 66.7 512 64.67c148.27 2.03 271.04 27.78 344.26 103.07C931.55 240.96 957.3 363.73 959.33 512c-2.03 148.27-27.78 271.04-103.07 344.26C783.04 931.55 660.27 957.3 512 959.33c-148.27-2.03-271.04-27.78-344.26-103.07C92.45 783.04 66.7 660.27 64.67 512z");
var path2 = document.createElementNS('http://www.w3.org/2000/svg', 'path');
path2.setAttribute('class', 'custom_switcher');
path2.setAttribute("d","M706.07 405.35H327.44c-18.64 0-33.9-15.25-33.9-33.9 0-18.64 15.25-33.9 33.9-33.9h378.62c18.64 0 33.9 15.25 33.9 33.9 0 18.64-15.25 33.9-33.89 33.9zM706.07 563.37H327.44c-18.64 0-33.9-15.25-33.9-33.9 0-18.64 15.25-33.9 33.9-33.9h378.62c18.64 0 33.9 15.25 33.9 33.9s-15.25 33.9-33.89 33.9zM475.54 721.4h-148.1c-18.64 0-33.9-15.25-33.9-33.9 0-18.64 15.25-33.9 33.9-33.9h148.09c18.64 0 33.9 15.25 33.9 33.9 0.01 18.65-15.25 33.9-33.89 33.9z");
path2.setAttribute("fill","#FFFFFF");

// 添加到页面上
switcher.appendChild(svg);
svg.appendChild(path1);
svg.appendChild(path2);
document.getElementsByClassName('joe_action')[0].appendChild(switcher);
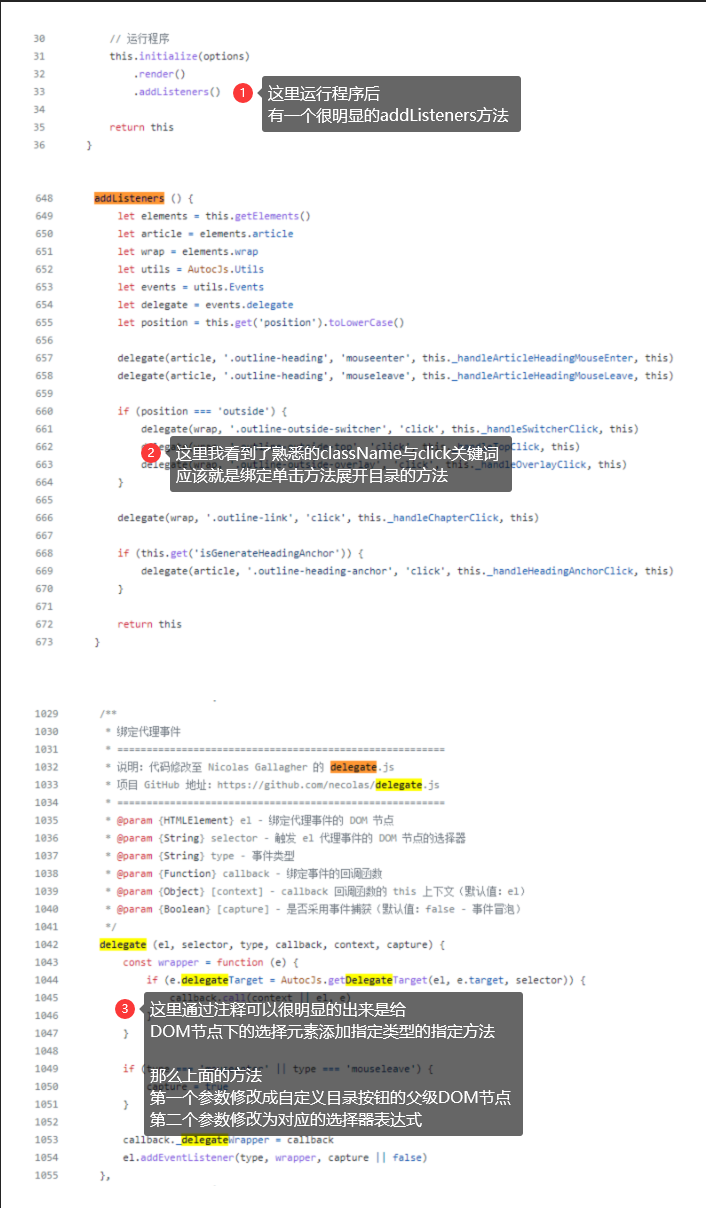
3.3 绑定展开目录的方法
这里可以根据 AutocJS 的源代码查看以下原本的代码是怎么做的
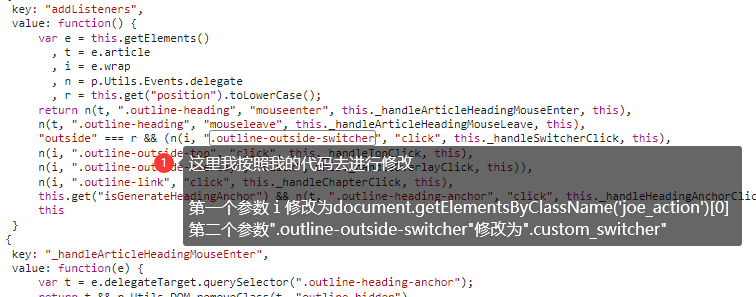
这个时候我们的按钮还有一点问题,点击的时候并不能展开目录,可能是前面的插入按钮的JS写的有一些问题,继续修改 JS,希望有大佬可以进行优化,不过我也已经用自己的方法解决了。
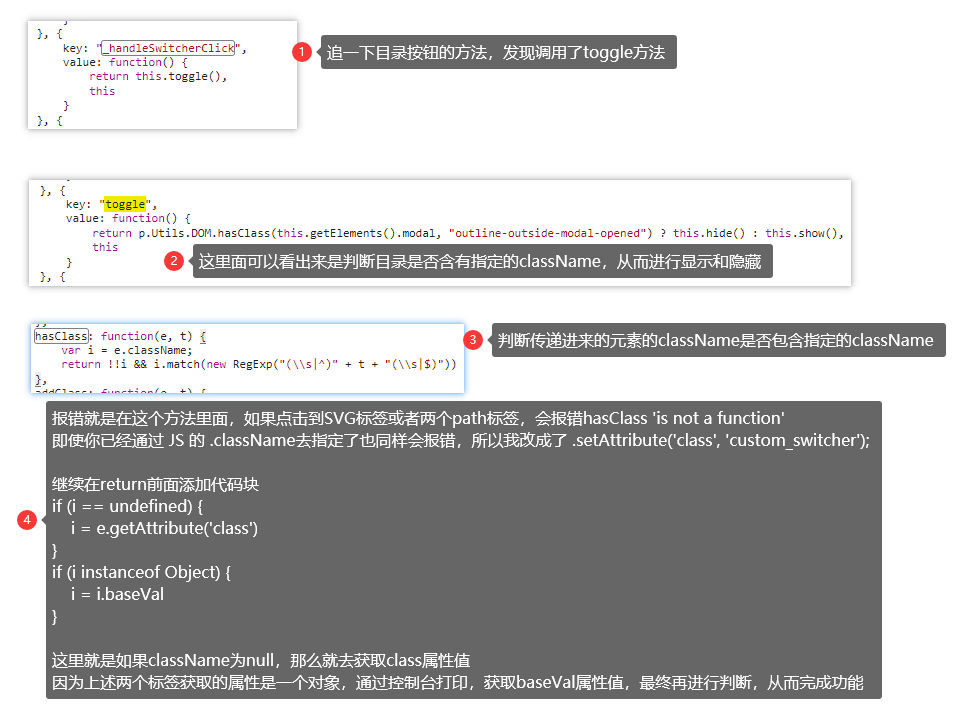
通过这里就完成了 Joe 的自动生成文章目录的需求了,虽然不是很完善,但是已经可以进行使用了
阅读建议


评论
匿名评论
隐私政策
你无需删除空行,直接评论以获取最佳展示效果


